Wednesday, May 16, 2012

The Top Ten Equations of Physics

The following equations are among the most used in the world of physics:

10) Velocity = Distance / Time

This is a basic equation we learned early in the year.  It is used to find the rate of speed an object is traveling at.  Here is a sample problem:

A car goes 50 miles in 75 minutes, what is its overall velocity?
Answer- V = D/T so V = 50/75 = 2/3
*2/3 Meters per second

Velocity is measured in m/s because it is a rate of time.


9) Acceleration = Fnet / Mass

This is not just an equation, it is Newton's Second Law of Motion, which specifically states that Acceleration is inversely proportional to mass, and directly proportional to Fnet.


8) Universal Gravitational Law- F = G m1 X m2 / d^2

The Universal Gravitational Law is very important to physics because it allows us to find the gravitational attraction between two large objects, planets, for example.  Another important factor that comes from this law is that as distance increases, the force between the two objects decreases.  Likewise, as the distance decreases, the force will increase.  This is why, if astronauts want to fly by other planets, they must not get too close, or the gravitational force of attraction will increase and they will be pulled into the planet.


7) Torque = Lever Arm X Force

This is a very important equation because it helps us to understand why, for instance, a longer wrench will work better in turning a bolt.  Since torque is jointly proportional to lever arm and the force, if you increase either one of the two, you will increase the torque.  So, if a bolt is incredibly hard to screw, you don't need to be extremely tough, you just need a bigger wrench.


6) Momentum = Mass X Velocity, P = mv

As shown by the equation, momentum is the product of the mass and velocity of an object.  The most interesting thing about this equation is that it shows that an object can have very little mass, but still have alot of momentum, like the remote-controlled car in this video:


5) Work = Force X Distance

Work is the product of force and distance an object is pushed.  Work can only occur if the force and the distance moved are parallel.  For example, if I were to carry a book across a room, my force on the book and the distance would be parallel, and no work would occur.  Here is an example problem:

If a 100 N man runs up a 7 meter high stair case, he produces 700 Joules of work.  It does not matter how fast he moves, because that is not part of the equation.


4) How Far (Free Fall)   D = 1/2 g t^2

This equation is important because it shows us how to know how far an object has fallen when no other forces are acting on it (air resistance, wind).


3) Kinetic Energy = 1/2 m v^2

Kinetic energy is the energy of moving things.  This equation allows us to determine the Kinetic Energy in a moving object at any given moment.  Kinetic Energy is also proportional to work because of the equation, (delta)KE = Work.  Here is an example:

A ball has a mass of 20 g, and it is moving at 100 m/s.  What is its Kinetic Energy?
- KE = 1/2 (20) (100^2) = 10 (10000) = 100000


2) Potential Energy = mass X gravity X height

Potential Energy is the opposite of Kinetic energy in that, it is found in stationary objects.  Also, height is a very important factor.  The higher you raise an object, the more potential energy it will have.  Here is an example:

A 10 g rock is on the edge of a cliff 50 m up.  How much PE does it have?
- PE = mgh = 10(10)(50) = 100(50)= 5000


1) OHM'S LAW- Current = Voltage/ Resistance

This is the most important equation in all of physics.  It shows us that as you increase the resistance, the current will decrease because the two are inversely proportional.  Electricity is a huge part of our every day lives.  So, it is imperative that we have a solid understanding of current and how it works in our homes.  If we do not use fuses, which cause the circuit to break if there is too much current, houses could catch on fire from all the current.


Tuesday, May 8, 2012

The Physics of a LAX Goalie


The Physics of a LAX Goalie

Jules R. Gonsoulin


You wouldn't guess it at first, but the goalie actually controls the speed and flow of a lacrosse game.  He is the "defensive quarterback".  He needs to know how to make good outlet passes.  Outlet passes are made after a save and are used to send the ball back down the field.  In order for an outlet pass to be successful, it needs to have height and speed.  That is where PHYSICS come into play.

The most important concept to understand is that the height of a projectile controls the amount of time it is in the air.  This is due to the equation, d = 1/2 g t^2.  The longer an object is in the air, the farther it will go.  Thus, you want to release the ball when it is at its highest point, so it will stay in the air for a long time, and you can complete long, full-field passes.

Tangential speed also comes into play here.  The farther away an object is from its center of rotation, the faster it will have to move to keep up with the center.  Since the stick is a rotating body, the objects farthest from the center of rotation will have the most horizontal velocity when released.  Since the ball is the farthest object from the center, it will move very quickly out of the stick.  If you can get the ball to move faster, your passes will be completed quicker, and your clears will be more efficient.


Principles Represented:
  • Torque
  • Rotational Motion
  • Tangential Speed
  • Projectile Motion
IDENTIFICATION- This photo is natural.


Monday, May 7, 2012

Unit 8 Reflection

In unit 8 of Physics, we studied magnetism and how it relates to electricity.  The concepts in this chapter were a  little hard to grasp, so I had to study alot outside of regular homework assignments.

The first topic we discussed was magnetic poles.  Every magnet has north and south poles.  Opposite poles attract, and same poles repel.  If a magnet were to be broken into two, there would be two equally strong magnets with their own poles.

Magnetism is produced by the motion of spinning charges called domains.  If the domains are all spinning in the same direction, or flowing in the same direction, they create a magnetic field.  Here is an image showing everything discussed so far:

As you can see, the flow of charges is from the south pole to the north pole.  The blue circle in the middle could in fact be Earth.  Earth is a magnet!  We have a North pole and a South pole.  More importantly, Earth's magnetic field protects us from harmful cosmic rays at most areas of the planet.  The rays cannot penetrate the magnetic field at the sides because they are going perpendicular to the magnetic field.  However, the rays can enter through the north or south pole, because they are moving parallel to the magnetic field.  This causes the popular "Northern Lights".

Another thing we talked about were motors.  Motors are simple apparatuses.  They are made up of an energy source, a magnet, and an armature of current carrying copper wire.  The energy source supplies energy to flow through the system, while the magnet creates a magnetic field.  When you turn it on, the armature feels a torque from the magnet and turns constantly in one way.  We made motors like this in class using a batter as our energy source.  The most important part was shaving the wire.  We could only shave on the bottom of the wire or else it would be pulled in different directions, and not flow steadily.  Here is a video of my motor at work:


Our next order of business was Electromagnetic Induction.  This was a tricky concept to understand.  The long and short of it is, when a magnet passes by a loop of wire, it induces a voltage, changing the current.  This is one of the most important aspects of physics, and it has been used to build appliances and machines all over the world throughout time.

In class, we looked very carefully at generators.  Generators use rotating coils and stationary magnets to turn mechanical energy into electric current.  A generator is essentially the opposite of a motor, in that a motor turns electric energy into mechanical energy and a generator turns mechanical energy into electrical energy.  This makes generators perfect for situations when there is a power surge.

Possibly the most important item we talked about was the Transformer.  A transformer has the ability to either step down or step up the value of voltage flowing through it.  It is made up of two coils of wire, one with more turns than the other.  When one magnetic field changes, it changes the other magnetic field, inducing a voltage.  It looks like this:


The purpose of a transformer is usually to keep objects plugged into the wall from burning up from the 120 Volts that come out.  Have you ever seen this little box on your laptop charger?

Yes, that is a transformer.  Since your computer can only handle about 10 volts, you need to step down the energy.  That is what this little box does.  This box gets very hot when it is in use because of the great value of voltage flowing through it.  It is important to note that transformers must use Alternating Current, so that the particles can change directions, in turn change the magnetic field about the primary.  If you must use DC, you have to turn the object on and off repeatedly to make the transformer work.

Overall, this chapter required a lot of memorization of basic concepts.  However, after I did memorize that stuff, it wasn't hard to synthesize it all into real world problems.  I really liked building the motor.  It helped me really visualize what we were talking about.


Thursday, April 26, 2012

Build-it-Yourself Motor

Recently in physics class, we all undertook the task of assembling a simple motor.  An Electric Motor is defined as an object that utilizes both magnetic fields and current-carrying conductors to generate a force.  To assemble the motor, I needed the following objects:

  • Battery- The purpose of the battery is to provide the electric energy for the rest of the system.
  • Magnet- The purpose of the magnet is to create a magnetic field around the system which can interact with the current-carrying conductors.
  • Copper Wire- The purpose of the copper wire is (when shaved properly*) to feel the magnetic force and move properly.
  • Paperclips- The purpose of the paper clips is to suspend the copper wire above the battery and the magnet, and also to carry the current to the wire.
  • Rubber Band- The purpose of the rubber band is simply to bind the paper clips to the battery.
Here is a picture of a make it yourself motor with a similar design to ours.  The only difference is that alligator clips were used to supply energy instead of our battery:


*Before the motor would work, the copper wire had to be scraped.  It was scraped on the bottom of both sides of the wire.  This made it easier for the wire to feel the torque of the magnet.  When the wire felt this force, the current flowed through the wire, and it turned.  It was very important for us to scrape the wire properly, because if we scraped it on the top and bottom, the wire would want to turn in different directions and it would not move straight constantly.

This simple concept can be used in large scale in cars, lawn mowers, fans, and blenders.  If you were to open up one of these appliances, you would see a huge coil of copper wire, and a magnet.  When applied to a larger scale, this design can be used to generate alot of mechanical power.

Here is a video of my motor at work!


Friday, April 13, 2012

Unit 7 Reflection (Not Finished)

This long unit covered all aspects of electricity in physics.  The first concept we looked at was that of electrostatics.  Electrostatics is the study of electric charge that is at rest, that is to say, there is no current.  We learned alot in particular about how things become charged.  There are a few ways in which something can become charged:


  • Contact-Something can be charged by friction or touching when one object steals valence electrons from another.  This is common in clothes driers.  In the drier, since there is alot of friction, some clothes steal electrons from other clothes, making some clothes positively charged and others negatively charged.  Since opposite charges attract, the clothes will stick together when they come out of the drier.
  • Induction-Objects can be charged by induction when they are close but not touching.  Here is how the process goes:
  1. The objects touch, resulting in one uncharged conductor.
  2. Negatively charged object is brought near one side of one object.
  3. Since opposites attract, the charges are forced to repel and reorganize, at separate ends.
  4. The objects are pulled apart, creating one negatively charged object and one positively charged object.
  • Polarization-Objects can be charged through polarization when one side of an object has many positive particles, which attracts to an object with negative particles on one side.  This is commonly seen with balloons when they stick to walls.
Another important subject we studied is Coloumb's Law.  It reads:

F= k q1q2 / d^2

This law is a mirror image of the universal gravitational law.  Similarly, as distance decreases, the force of electric attraction between two objects increases.

We also talked about conductors and insulators.  Conductors are objects that allow electricity to flow very easily.  Metal is an example of a conductor.  Insulators are objects that do not allow electricity to flow easily.  One question we were constantly faced with was: Why does saran wrap stick easily to a ceramic bowl, but not a metal one?

The answer is: The saran wrap sticks to the ceramic bowl because its electrons are not allowed to flow through the bowl and out because the bowl is an insulator and the electrons are caught inside it.  With a metal bowl, electrons easily flow through the bowl and out, making both the saran wrap and the bowl uncharged.  Without charge, the two will not stick to each other.

We also discussed electric fields.  Electric fields seemed very simple because I already took chemistry, and we dealt with E- fields very often.  They can be defined as "auras" surrounding a charged object.  The arrows coming out of the inner circle are very important as they represent the magnitude and direction of the electric field.

The last item we studied in Chapter 22 was Electric Potential.  This is where we were introduced to voltage.  the equation for Electric Potential is:

Voltage = electric potential energy / charge

Electric potential lead us into the second half of this unit, in chapter 23 entitled "Electric Current"

The first item we discussed in this chapter was electric current.  Electric Current is the flow of electric charge through some sort of line or wire.  Electric resistance counteracts electric current in that it is the property of material to resist the flow of electric current.  There are few different ways you can change the resistance on an object:
  • Thickness- A thinner filament will increase the resistance, decreasing the electric current.
  • Heat- As heat increases, so will the resistance, causing the electric current to decrease.
Once we knew all about current, voltage, and resistance, we learned about Ohm's Law.  Ohm's law is written as:
Current = Voltage / Resistance 

This equation shows us that resistance is inversely proportional to current, which is a very important aspect of physics.  Since current is proportional to brightness/functionality of appliances, if the resistance increases, decreasing the current, the brightness etc will go down.  For this reason, some light bulbs shine brighter than others.  It is important to note that there can be no voltage, and therefore no functionality of appliances, without potential difference.  For example, a bird can stand on one power line without being shocked because the current is flowing one way, therefore there is no potential difference and no complete circuit.  If it touches two wires, however, there is potential difference and the bird completes the circuit giving it an electric shock.

There are two types of current:
  • Direct Current (dc)- Particles flow in just one direction.
  • Alternating Current (ac)- Particles vibrate in different directions.
We then studied electric power.  Electric power is the rate of energy transfer, the amount of energy per unit, and can be found with this equation:
Power = current x voltage

Finally, we learned about two different types of circuit.
  • Series Circuit- In series, all appliances are connected one way, if one appliance is unplugged, all others stop working.  This type of circuit uses less current.
  • Parallel Circuit- In parallel, appliances are connected so that voltage acts across each one, each appliance completes the circuit.  If one appliance goes out, all others are not affected.  
Given the definitions of each circuit, it is easy to see why most homes and workplaces are wired in parallel.  If  they weren't, all the lights would turn off if one turned off.

We can also see why an entire boarding school dorm may lose energy when girls are getting ready for prom.
Since the building is run on parallel circuit, the more appliances that are turned on, the more current will flow through the system.  When too much flows, the fuse breaks, and the circuit becomes incomplete.

This chapter did not seem to particularly hard.  I found it easy to grasp the concepts, and the problem solving was not difficult because everything used simple equations, such as I = V / R.

Sunday, February 26, 2012

Unit 6 Reflection

In the latest Chapter of Physics, we studied Work, Power, and Energy.

Work is the measure of force that is applied to an object over a distance that is parallel to the said force.  The most important word in the preceding sentence is PARALLEL.  If the force is not parallel to the distance it is being moved, no work is generated. For example, the act of a person walking up a flight of stairs generates force, while the act of carrying a book across a classroom does not.  In the case of the book being carried across a classroom, the force of the book is downward, while the distance is from left to right, meaning that the two are perpendicular, and no work is generated.  The equation for work is:

                                                                  W = F x D
Where F = Force and D = Distance.  For example, if a 100 N man runs up a 7 m high staircase, he exerts 700 Joules of work.  In terms of work, it does not matter whether the man runs or walks.  His speed does affect his Power, however.

Power is essentially a rate of work.  The equation for Power is P = Work Done/Time Interval.  Therefore, if you are to exert 500 Joules in 5 seconds, your power is 100 watts.  In the following video, let's pretend Rocky weighs 100 N, and the stairs are 30 meters high.  He would exert 3000 Joules of Energy.

He also runs up the stairs in 8 seconds.  Therefore, we would use the equation P=W/t and substitute, leaving us with P= 3000/8 and find that he exerted 375 watts of power.  That's why he is a beast!

The next item we learned about is Gravitational Potential Energy.  The equation for potential energy is PE=mgh, or if you know the force, it is PE=Fh.  The h is significant because it stands for height.  Height is the most important aspect of potential energy.  This is because the high the object is, the more potential energy it has, and ultimately the more kinetic energy it can have.

Kinetic energy is the energy found in moving things.  The faster something is moving, the more kinetic energy it has.  Kinetic energy is proportional to work because of the equation Change in Work = Kinetic Energy.  The true equation for KE is KE=1/2mv^2.

As an object loses potential energy, it gains kinetic energy.  This is due to the Law of Conservation of Energy.      This law is what inhibits the operation of roller coasters.  Have you ever noticed that the first hill is always the tallest?  This is because that first hill gives the coaster alot of potential energy, which means it will be converted to alot of kinetic energy, giving the car enough speed to get through the rest of the track.  Watch closely on this roller coaster:
It is easy to see that the first incline is the tallest, and gives this ride alot of speed for the rest of the track.You can literally feel the physics!

The next topic we discussed was machines.  Machines are designed to help us exert less force and get more force out.  The most simple machine is a pulley.  Pulleys are designed to decrease the force while increasing the distance to increase the force outcome.  Watch how Jack and Jill use a pulley to pull water out of a well in the following video:
You can know just how well a machine is doing its job by finding the efficiency of it.  To find the efficiency, you simply use the equation, Efficiency = work done/work expected and convert the answer to a percentage. It is impossible to have a machine with 100% efficiency because energy is always lost as heat or friction.

Reflection:
Overall, this unit was not too challenging.  My problem solving skills did not suffer to much because most of the equation are easy to remember and use.  I found the need often to be very specific in my answers, because there are many trick questions in this chapter.

Final Mousetrap Car Blog

In the end, our car clocked in at an impressive 0 m/s.  However, I still learned oceans about physics from this project.  I also learned good problem solving skills that I will need later on in my life.  Here are the physics of the mousetrap car that I learned:

Newton's Laws can be applied to this car.  Newton's 1st law, which states that an object in motion will stay in motion until an outside force acts on it (and the converse for an object at rest), means that if we decrease the possibility for outside forces to interact with our car, we will increase its odds of reaching the finish line.  Newton's Second Law states that Acceleration is proportional to Fnet and inversely proportional to Mass, therefore, the more we decrease the mass, the better the acceleration of the car will be.  This led us to use the lightest possible materials, such as wooden skewers and paper towels.  Newton's Third Law states that for ever action there is an equal and opposite reaction.  We applied this aspect of physics to our lever system.  We knew we had to decrease the friction between the string and the axis, so we tied the string to the axis in a quadruple under over knot, and taped it as tightly as possible.

Two types of Friction that were present in the making of this car were air resistance and surface friction.  Air resistance is difficult to change because the faster the car goes, the more air resistance there is.  However, we could decrease air resistance on the car by decreasing the surface area.  We did this by taping down all loose paper towels to make sure there was nothing that could spread out and increase the surface.  We used surface friction to our advantage.  Initially, CD's seemed like a bad choice for wheels.  However, once we covered them in duct tape and increased the friction on the ground, the car moved very smoothly.

It didn't take much thought to decide which wheels we would use.  We knew CD's would be a great choice because they have a very low rotational inertia due to the fact that the mass is evenly distributed throughout.  This meant that they would be easy to get moving.  Also, the fact that they are larger than, RC Car wheels, for instance, means that they have more mass, giving them more rotational velocity.  We chose to use 4 wheels simply because it was all we had room for.

The Law of Conservation of Energy (Force in X Distance in = Force out X Distance out) played a large role in the making of the mousetrap car.  We knew that if we made the lever arm very long, in addition to increasing the force, we would see a long distance output and strong force output.  It is for this reason that we decided to make our lever arm out of 3 wooden skewers taped together tightly.  This gave the lever arm strength and length, increasing our work output twofold, and making the car very efficient.

The work done by the spring was impossible to calculate because we could not calculate the Force (weight) of the spring, and Work = Force X Distance.  Calculating the force of the spring would involve removing the spring and actually weighing it, which would render our mousetrap unusable.  We also cannot calculate the amount of Potential Energy on the spring because PE = mgh, and the height of the spring is minuscule throughout its path, and changing very quickly, making it very hard to take into account.  Thus, we cannot calculate the Kinetic Energy on the car.  We cannot calculate the Force the spring exerted because we cannot find the mass of the spring to use the equation A = Fnet/m

The final product of this project was very different from our original design.  The biggest difference was that  our wheels were more stable than they ever were.  We had to apply many feet of tape to the car to make this change. We still encountered many problems, for example, the wheels did not have enough friction on the axis  to move as quickly as the axis moved.  Because of this, the wheels simply wouldn't move when we set the mousetrap off.  This problem never got fixed, but it was probably due to the makeshift axis.  In the future, I would like to have more time for planning, and also more supplies.  I feel like I entered this project blind as to how to make one of these cars.

Wednesday, February 22, 2012

Mousetrap Car: Day 2

The most important step we took going forward was to get new supplies.  Here is a list of our new supplies:

  • CD's- These will function as our wheels.  Since the mass is evenly distributed throughout, they will have less rotational inertia, and will hopefully go quite fast.
  • Wooden Skewers- These are thin enough to fit into our eye hooks, so they should work well as axis.
  • Paper Towels- We will use paper towels to wrap around the skewers, which will fill in the gap between the inside of the wheel and the skewer.
  • Tape (lots of it)- We will use tape to secure not only the paper towels to the Skewers, but also to secure the wheels to the paper towels.
  • A rubber band- Instead of a string to act as the lever arm force for the car, it should provide extra force since it is stronger.
We also faced new challenges in building our new design.  Here are a few:

  • The skewer would not stop rotating from left to right: To fix this, we put heavy layers of tape on the skewer in between the eye hooks, to act as an anchor, and keep the skewer in place.  This worked very well.
  • The CD's were touching each other: To combat this, we aligned the CD's so that the back wheels were farther apart than the front wheels.  This kept them from rubbing against each other.
  • The rubber band would not move the car: We decided to switch our tactic and tape two skewers together to create a long lever arm.  Then we taped this to the lever on the mouse trap to create the lever arm system.  We tied a quadruple over-under knot on the lever, then taped over that for safety.  We did the same on the back axis.
  • The Lever Arm came off of the mouse trap lever: To fix this, we simply applied more tape and made it sturdier. 
  • The lever system did not move the car: We still need to find a solution to this problem. We believe that the wheels are not sticking to the axis, therefore when the axis turn very fast, the wheels cannot keep up and simply stay put while the axis turns quickly inside the wheels.  To fix this, we may need to completely change the way we keep the wheels on the axis.  

Thursday, February 9, 2012

Mousetrap Car Day One

Due to some severe communication issues with my partner, the project did not go as planned for the first day.  We found ourselves without key parts to build the car.  However, we put our minds together and began work on a new design, one much simpler than our original plan.

Since we were at a loss for parts, our only step forward was:

  • Drill big eye holes into the ends of the mousetrap.  These will hold skewers, which will server as our new axis. 
  • The skewers will be centered in the eye holes and then we will apply cotton swabs to each side, these will work to keep CDs (not records) to the skewers.
  • The reason we are not using Records is because they are too big, and it would be hard to set up the car without all four records touching each other and upsetting the path. 

It will be very important to  make sure the CDs are tightly fit on the axis.  This will help make sure that the car can achieve the maximum speed possible.  We will also need to put tape or some other source of grip on the CDs to make sure they have enough friction to propel forward.

In order to solve our biggest problem (not having supplies or time to get them), we will resort to finding materials around our house/room that can work for the project.   

Thursday, February 2, 2012

Mousetrap Car: Blog

In order to build this mousetrap car, I will need the following items:

  • 4 Vinyl Records-since they are large, and have a very low rotational inertia, they will function well as the wheels for the car.
  • Mousetrap-provided by Mrs. Lawrence.
  • 2 BIC pins (smooth kind) to use as axis for the wheels.
  • Small balloons- I can use these to wrap around the wheels which will give them more traction.  I only need to apply them to the back wheels.  However, they can also be used to fit the inside of the wheel close to the axis.
  • 4 eye hooks- These need to be big enough for the pens to fit through and be able to move, however, the pen needs to not movie in an out of the hooks.  Therefore I should devise a plan to keep the pen centered.
  • String- This will be connected to the the back axis and the pen of the mousetrap so that, when set off, will propel the car forward.
This will be my construction process:
  • Pull the ends off of the pins, as to make them hollow.
  • Cut holes in the balloons, so they will fit over the wheels, to give the wheels more traction.
  • Fit the eye hooks on the pins, firmly but not too tight.
  • Make a hole in the frame of the pen, and thread the string through.
  • Put the eye holes in the mouse trap like so:
  • Insert front axis, (one without string).
  • Wrap unused balloons around ends of the front axis tightly.
  • Insert wheels onto axis.
  • Repeat for back wheels

Monday, January 30, 2012

Unit 5 Reflection

During our first physics unit after winter break, we studied concepts that relate to rotating systems.  The first concepts we discussed were tangential motion and rotational motion.  It is important to note, that rotational motion is always constant, while tangential speed increases as the object moves farther away from the axis.  This is because regardless of location on the system, every object wants to make the same number of rotations.  However, as an object moves farther away from the axis of rotation, it needs to go alot faster in order to keep up with the axis.

We then learned about rotational inertia.  Rotational inertia is the property of rotating objects to stay at rest or stay in motion.  It is very similar to linear inertia, which we learned about in the beginning of the year.  One key difference however, is that linear inertia depends highly on the mass of the object.  While rotational inertia depends on the distribution of mass throughout the object.  If an object has its mass distributed evenly throughout, it will have less rotational inertia than one with the mass concentrated far from the axis.

One question constantly asked to utilize this property is as follows: What will win in a downhill race? A bowling ball, or a volleyball.
      The answer is a bowling ball, which seems very unlikely to someone who has not studied physics yet.  This is because the bowling ball has alot of mass, and it is distributed evenly throughout.  The volleyball is filled with air, and is surrounded by a rubber sphere.  This concentrates all the mass outward.  Therefore, the bowling ball has less rotational inertia, and will be easier to get rolling, and will ultimately win the race. (Nice try physics!)

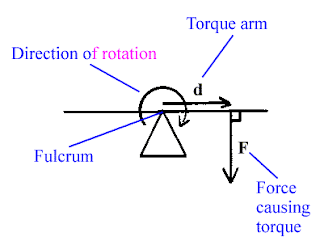
Next, we learned all about torque.  Torque is what causes rotating objects to stop or move.  We already learned that outside forces either impede or increase the motion of moving objects.  Well, torque is that outside force for rotating objects.    Torque has two key components: the lever arm, and the force.  In order to have a large torque, you can increase the length of the lever arm, or simply apply more force.  Also, the lever arm must be perpendicular to the object you are trying to move.  The following diagram is a good representation of torque.

*Mark that in this diagram, "lever arm" has been changed to "torque arm"

We then moved on the Centripetal and Centrifugal force.  Centripetal force is the force that causes an object to move towards the center of rotation, such as when a car rounds a curve.  Centrifugal force is what we humans conceive to be the force that pushes us away from the axis of rotation.  However, centrifugal force is not real.  One instance of people falsely bringing up centrifugal force is when a car rounds a curve, and the person in the passenger seat feels pushed towards the door.  This is not the work of a force.  It simply shows the passenger's inertia at work.  It is actually the door that hits the person, but, due to Newton's 3rd Law which states that for every action there is an equal and opposite reaction, the person applies force to the door.  

One example of centripetal force is the orbiting of planets.  The moon, for example, is pulled towards the earth by the centripetal force known as gravity, and it continues to rotate around the planet.  Without the centripetal force, it would float away into space.
This is an example of centripetal force at work in a roller coaster, as it makes a loop.


The final topic we discussed was angular momentum, or rotational momentum.  Angular momentum is very similar to linear momentum.  One way it is similar, is that it must be conserved.  One example of this at work is when an ice skater goes to spin in the air, she brings her arms to her chest, as to decrease her rotational inertia.  Since angular momentum is constant (must be said in every answer), her speed will increase, giving her more rotations and a better score.

Overall, this unit was not very challenging.  The calculations were rather simple.  I was mainly dealing with the equation for torque, setting it up and balancing it to find measures of forces.  This unit relates greatly to the real world.  For example, if you want to go very fast on a merry go round, you want to pick the horse farthest away from the axis of rotation, as to increase your tangential momentum.

Sunday, January 22, 2012

Finding the Mass of a Meter Stick without a Scale

Step 1 of this lab was to describe what steps I would take to find the mass of the meter stick without the use of a scale, but with the use of a 100g lead weight.
I would use these equations:
Torque = Lever Arm X Force
(I would later realize that I needed W=Mg, but it was not in my original plan).

My Plan:
Find the length of each lever arm when the meter stick is balanced with the weight on one side, then use the torque equation to find the value of the force on the other side.

My Reasoning:
Left Force(weight) X Left Lever Arm = Right Force(unknown) X Right Lever Arm
This equation shows that when the stick is balanced on a fulcrum with the 100g weight on one side, the clockwise and counter-clockwise torques will be equal.  Therefore, solving for x should produce the mass of the meter stick.

My next step was to execute my plan and find the mass of the meter stick with the given materials.  First, I sketched a drawing of what the system should look like.  Then I placed the meter stick on the edge of a table, and placed the weight on one end.  One error I encountered while setting the experiment up was that I placed the weight closer to the fulcrum, when I should have placed it all the way to the side, increasing the lever arm length.  I then measured the length of each lever arm.  The side with the weight had a 30 cm lever arm, while the other side had a 20 cm lever arm.  One mistake I made during the measuring process was that I measured the entire right side and took that as the lever arm.  That would indicate that all the force acts at the very tip of the meter stick, which is not true.  I had to re measure from the fulcrum to the center of mass, because that is where the force acts to pull the ruler down.

My next step was to set up my numerical equation.  I had to remember to use w = mg to convert all of my measurements to the proper units, and also to use 9.8 N as the measurement for gravity, since we are in the real world and can use calculators.  My equation was:
                     
 .98 N X 30 = 20X

In the equation, the X on the right side represents the force on the right side of the meter stick.  I then solved for X and the answer I got was 1.47 N.  Since the prompt asked for the MASS of the meter stick, I needed to convert the answer to kilograms.  Once I did this, my answer was 147 kilograms, which is very close to the actual mass of the meter stick.